# Open-AutoGLM Quick Start for Coding Agent

> **本文专为 AI 助手(如 Claude Code)阅读,用于自动化部署 Open-AutoGLM。**
>
> **This document is designed for AI assistants (such as Claude Code) to automate the deployment of Open-AutoGLM.**
>
> 如果你是人类读者,可以跳过本文,按照 README.md 文档操作即可。
>
> If you are a human reader, you can skip this document and follow the README.md instructions instead.
---
## Table of Contents / 目录
- [English](#english)
- [中文](#中文)
---
# English
## Prerequisites
### 1. Python Environment
Python 3.10 or higher is required.
### 2. ADB (Android Debug Bridge)
1. Download the official ADB [installation package](https://developer.android.com/tools/releases/platform-tools)
2. Extract and configure environment variables:
**macOS:**
```bash
# Assuming extracted to ~/Downloads/platform-tools
export PATH=${PATH}:~/Downloads/platform-tools
```
**Windows:** Add the extracted folder path to your system PATH. Refer to [this tutorial](https://blog.csdn.net/x2584179909/article/details/108319973) if needed.
### 3. Android Device Setup
Requirements:
- Android 7.0+ device or emulator
- Developer Mode enabled
- USB Debugging enabled
**Enable Developer Mode:**
1. Go to `Settings > About Phone > Build Number`
2. Tap rapidly about 10 times until "Developer mode enabled" appears
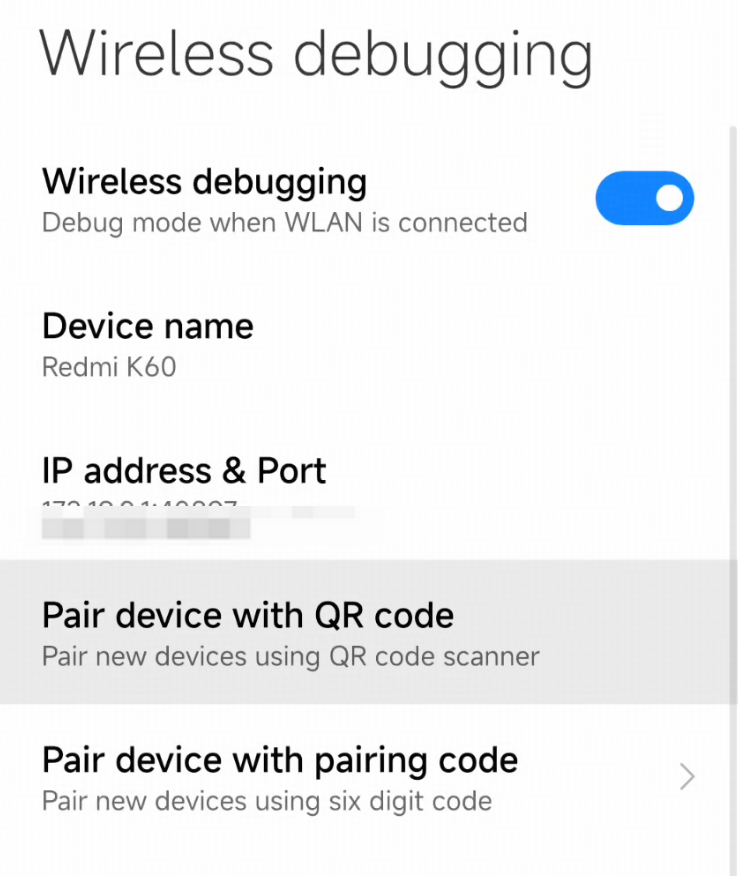
**Enable USB Debugging:**
1. Go to `Settings > Developer Options > USB Debugging`
2. Enable the toggle
3. Some devices may require a restart
**Important permissions to check:**

### 4. Install ADB Keyboard
Download and install [ADB Keyboard APK](https://github.com/senzhk/ADBKeyBoard/blob/master/ADBKeyboard.apk) on your device.
After installation, enable it in `Settings > Input Method` or `Settings > Keyboard List`.
---
## Installation
```bash
# Install dependencies
pip install -r requirements.txt
# Install package
pip install -e .
```
---
## ADB Configuration
**Ensure your USB cable supports data transfer (not charging only).**
### Verify Connection
```bash
# Check connected devices
adb devices
# Expected output:
# List of devices attached
# emulator-5554 device
```
### Remote Debugging (WiFi)
Ensure your phone and computer are on the same WiFi network.
```bash
# Connect via WiFi (replace with your phone's IP and port)
adb connect 192.168.1.100:5555
# Verify connection
adb devices
```
### Device Management
```bash
# List all devices
adb devices
# Connect remote device
adb connect :
# Disconnect device
adb disconnect :
```
---
## Usage
### Command Line
```bash
# Interactive mode
python main.py --base-url --model
# Execute specific task
python main.py --base-url "Open Chrome browser"
# Use API key authentication
python main.py --apikey sk-xxxxx
# English system prompt
python main.py --lang en --base-url "Open Chrome browser"
# List supported apps
python main.py --list-apps
# Specify device
python main.py --device-id 192.168.1.100:5555 --base-url "Open TikTok"
```
### Python API
```python
from phone_agent import PhoneAgent
from phone_agent.model import ModelConfig
# Configure model
model_config = ModelConfig(
base_url="",
model_name="",
)
# Create Agent
agent = PhoneAgent(model_config=model_config)
# Execute task
result = agent.run("Open eBay and search for wireless earbuds")
print(result)
```
---
## Environment Variables
| Variable | Description | Default |
|---------------------------|---------------------------|------------------------------|
| `PHONE_AGENT_BASE_URL` | Model API URL | `http://localhost:8000/v1` |
| `PHONE_AGENT_MODEL` | Model name | `autoglm-phone-9b` |
| `PHONE_AGENT_API_KEY` | API key | `EMPTY` |
| `PHONE_AGENT_MAX_STEPS` | Max steps per task | `100` |
| `PHONE_AGENT_DEVICE_ID` | ADB device ID | (auto-detect) |
| `PHONE_AGENT_LANG` | Language (`cn`/`en`) | `cn` |
---
## Troubleshooting
### Device Not Found
```bash
adb kill-server
adb start-server
adb devices
```
Check:
1. USB debugging enabled
2. USB cable supports data transfer
3. Authorization popup approved on phone
4. Try different USB port/cable
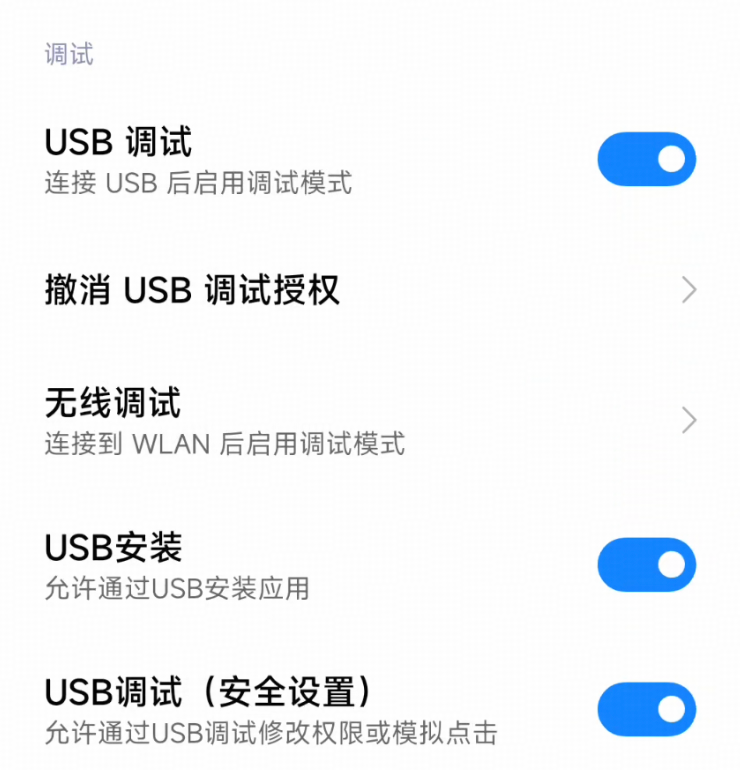
### Can Open Apps but Cannot Tap
Enable both in `Settings > Developer Options`:
- **USB Debugging**
- **USB Debugging (Security Settings)**
### Text Input Not Working
1. Ensure ADB Keyboard is installed
2. Enable in `Settings > System > Language & Input > Virtual Keyboard`
### Windows Encoding Issues
Add environment variable before running:
```bash
PYTHONIOENCODING=utf-8 python main.py ...
```
---
# 中文
## 环境要求
### 1. Python 环境
需要 Python 3.10 及以上版本。
### 2. ADB (Android Debug Bridge)
1. 下载官方 ADB [安装包](https://developer.android.com/tools/releases/platform-tools?hl=zh-cn)
2. 解压并配置环境变量:
**macOS:**
```bash
# 假设解压到 ~/Downloads/platform-tools
export PATH=${PATH}:~/Downloads/platform-tools
```
**Windows:** 将解压后的文件夹路径添加到系统 PATH。可参考[此教程](https://blog.csdn.net/x2584179909/article/details/108319973)。
### 3. 安卓设备配置
要求:
- Android 7.0+ 设备或模拟器
- 开发者模式已启用
- USB 调试已启用
**启用开发者模式:**
1. 进入 `设置 > 关于手机 > 版本号`
2. 连续快速点击约 10 次,直到提示"开发者模式已启用"
**启用 USB 调试:**
1. 进入 `设置 > 开发者选项 > USB 调试`
2. 开启开关
3. 部分设备可能需要重启
**请务必检查以下权限:**
### 4. 安装 ADB Keyboard
在设备上下载并安装 [ADB Keyboard APK](https://github.com/senzhk/ADBKeyBoard/blob/master/ADBKeyboard.apk)。
安装后,在 `设置 > 输入法` 或 `设置 > 键盘列表` 中启用。
---
## 安装
```bash
# 安装依赖
pip install -r requirements.txt
# 安装包
pip install -e .
```
---
## ADB 配置
**请确保 USB 数据线支持数据传输(而非仅充电)。**
### 验证连接
```bash
# 检查已连接设备
adb devices
# 预期输出:
# List of devices attached
# emulator-5554 device
```
### 远程调试(WiFi)
确保手机和电脑在同一 WiFi 网络中。

```bash
# 通过 WiFi 连接(替换为手机显示的 IP 和端口)
adb connect 192.168.1.100:5555
# 验证连接
adb devices
```
### 设备管理
```bash
# 列出所有设备
adb devices
# 连接远程设备
adb connect :
# 断开设备
adb disconnect :
```
---
## 使用方法
### 命令行
```bash
# 交互模式
python main.py --base-url <模型API地址> --model <模型名称>
# 执行指定任务
python main.py --base-url <模型API地址> "打开美团搜索附近的火锅店"
# 使用 API Key 认证
python main.py --apikey sk-xxxxx
# 使用英文系统提示词
python main.py --lang en --base-url <模型API地址> "Open Chrome browser"
# 列出支持的应用
python main.py --list-apps
# 指定设备
python main.py --device-id 192.168.1.100:5555 --base-url <模型API地址> "打开抖音刷视频"
```
### Python API
```python
from phone_agent import PhoneAgent
from phone_agent.model import ModelConfig
# 配置模型
model_config = ModelConfig(
base_url="<模型API地址>",
model_name="<模型名称>",
)
# 创建 Agent
agent = PhoneAgent(model_config=model_config)
# 执行任务
result = agent.run("打开淘宝搜索无线耳机")
print(result)
```
---
## 环境变量
| 变量 | 描述 | 默认值 |
|---------------------------|------------------|----------------------------|
| `PHONE_AGENT_BASE_URL` | 模型 API 地址 | `http://localhost:8000/v1` |
| `PHONE_AGENT_MODEL` | 模型名称 | `autoglm-phone-9b` |
| `PHONE_AGENT_API_KEY` | API Key | `EMPTY` |
| `PHONE_AGENT_MAX_STEPS` | 每个任务最大步数 | `100` |
| `PHONE_AGENT_DEVICE_ID` | ADB 设备 ID | (自动检测) |
| `PHONE_AGENT_LANG` | 语言 (`cn`/`en`) | `cn` |
---
## 常见问题
### 设备未找到
```bash
adb kill-server
adb start-server
adb devices
```
检查:
1. USB 调试是否已开启
2. 数据线是否支持数据传输
3. 手机上的授权弹窗是否已点击「允许」
4. 尝试更换 USB 接口或数据线
### 能打开应用但无法点击
在 `设置 > 开发者选项` 中同时启用:
- **USB 调试**
- **USB 调试(安全设置)**
### 文本输入不工作
1. 确保已安装 ADB Keyboard
2. 在 `设置 > 系统 > 语言和输入法 > 虚拟键盘` 中启用
### Windows 编码异常
运行代码前添加环境变量:
```bash
PYTHONIOENCODING=utf-8 python main.py ...
```
---
## License
This project is for research and learning purposes only. See [Terms of Use](resources/privacy_policy.txt) / [使用条款](resources/privacy_policy.txt).